Dealing With the Bugs
(Reclaim the outdoors)
When bugs are bad they dominate your experience of being outside. They can take all the enjoyment out of being
someplace beautiful and remind you why other people spend most of their time indoors. If you have a good tent,
you can hide in that. (Unless you are in bear country, then you must come out and away from the tents for all things
relating to food.) But you don't go to the wilderness to cower in a tent. Here are some suggestions for reclaiming
the outdoors by keeping the dern bugs at bay. These are based on my experience and collobration with Hank Hays
at Lightening Paddle.
Moving
Usually the bugs don't bother me while I'm moving, either hiking or padling. This is the simple, often
very effective, and what I came to do anyway. And it is a blessing because being harrased by bugs while hiking
or paddling is pure hell..
Moving can be used in camp too, though usually in frantic despiration for escape from bugs. I've eaten
meals while walking around camp at a fast pace, but did not enjoy it. Except for the most hard driving trips
it is nice to be able to stop, rest, and enjoy the scenery.
Advantages
- It's a natural part of wilderness travel and what you will be doing most days.
- No extra equipment needed - good when you are moving fast and light.
|
Disadvantages
- Does not allow you to rest.
- Hard to do while cooking, etc.
- Not a to enjoy a meal.
|
Chemicals
There are several different types of chemical repellent available:
- Citronella. This is a slightly orange scented "natural" chemical. It is not particularly unpleasant
to wear and you may even notice a slight reduction in the number of bugs landing and biting you.
- DEET. This is the active ingredient in many bug repellents. You can get repellents in different strengths,
up to nearly 100% DEET. The stronger the concentration the less pleasant and more effective it becomes. When it
is working you'll see the bugs land and fly off again.
There are several options for application: liquid, stick, spray. I like liquid because it's simple and
simple packaging.
There are several other chemicals that are rumored to work: Bounce fabric softener, Skin So Soft
conditioner, garlic, vitimins. They have never worked for me or anyone I know. It is possible that
they act as a slight deterrent and would provide some "protection" when the bugs are not bad..
I suspect that the people who use these methods have never been in a really bad bug situation.
Advantages
- Cheap.
- Easy to carry.
- Quick to apply.
- Non bulky to wear.
|
Disadvantages
- They are toxic and unpleasant to wear.
- They don't keep the bugs from swarming, just from landing and biting. And they may not keep the bugs from landing
anyway.
- They can damage some plastics.
- The bottle can leak
|
Camp Site Selection
Where you put your camp site may have great impact on how many bugs are around to bother you.
Look for
- Open to a breeze to keep the bugs down.
- Dry ground such as gravel bar.
- Lee shore (wind blowing off shore).
|
Avoid
- Sites near boggy areas.
- Thick veggitation.
|
How you arrange your camp site will also affect the bug situation. Setting your kitchen so that it is exposed
to wind will keep the bugs down. Putting up a tarp will cause the bugs to congregate under the tarp with
you.
To be honest, I usually think about scenery or ease of access more than bugs when picking a site.
Barrier
This is my preferred method. It eliminates both bites and the sense of bugs landing on me. There are several
types of barriers that you can call on for protection.
Clothing
This is the first line of defense and one of the best. It is important to pick the right clothing.. Bugs can
bite through most light to medium weight knits and loose weaves; these will not protect you. However, thicker layers
or tight weaves are impenetrable. Thick pile jackets and pants work well in cold weather. One of my new items is
a pile balaclava which seems to protect my whole head. Light but very tightly woven nylon pants and shirts provide
protection in warm weather. Rain jackets, gortex and otherwise, are excelent protection but can be bulky or warm
to wear. (I have hiked through a forest wearing nothing but a gortex jacket on top, ziped up and sealed tight at
the wrists.)
A bandanna under a hat works well in warm weather, and keeps the sun off your ears and neck, but is not really
bug proof. In bad bug situations a bug net hat protects your whole head. I have one, but have used it only occasionally.
I generally build a bug proof wardrobe with general purpose clothing: a windproof shirt, some nylon pants, etc.
The sort of clothing that I would buy and wear on trips any way. Alternately, you can buy clothing specifically
designed as bug protection from xxx. There web site is at www.bugshirt.com
where you can see samples of their clothing, including a shirt with hood and face net. I've not used their stuff,
and it may be a little to single purpse for me. But for some people these may be just the thing.
Advantages
- You are usually wearing clothing, a change in the clothing you choose can make it also serve as bug protection.
- Clothing that provides good bug protection also provides good protection from wind and sun.
|
Disadvantages
- Uncomfortable in hot weather.
|
Tents
You'll bring a tent on most wilderness trips, and expect it to provide shelter from the bugs. Fortunately, most
provide fine shelter. Nearly all tents made in the past ten years use the fine mesh that keeps out even the smallest
bugs. It is rare for tents to get holes, but bring some sticky back rip stop nylon repair tape for field repairs.
I have field repairs done years ago which are still in great shape.
Advantages
- You probably bring a tent any way so it is not extra equipment and it keeps the bugs out.
|
Disadvantages
- You didn't come to the wilderness to spend all the time holed up in a tent.
- In bear country you are forced out of the tent to cook dinner away from where you are going to sleep.
|
Bug Shelters
This is my favorite way to deal with the bugs. It provides a place of rest that is not the tent and usually
open enough such that you feel like you are outside. Bug shelters are generally some sort of tent made mostly from
mesh, which provide a "bug reduced" environment. Some also provide rain shelter and others not. Most
have no floors.
Advantages
- Provides a comfortable place to lounge while still outside.
- You don't have to wear bulky or over warm clothing.
|
Disadvantages
- Fairly expensive.
- Additional bulk and weight to carry and set up.
-
|
Here are some options:
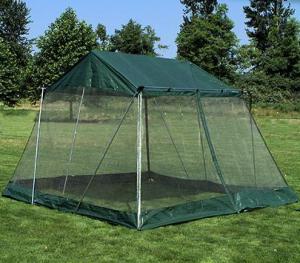
Commercial Bug Shelters:
Inexpensive
You can buy bug shelters like this one for under$100. Their man advantage is that they are very large. Their
main disadvantage is that they are heavy and bulky. Weight is usually 20lbs to 40lbs and would not work for kayaking
or backpacking.
I found the one at right at the REI outlet, where REI sells discounted
equipment. Something similar is made by Eureka. You
can often find similar shelters at local sporting goods stores.
|
 |
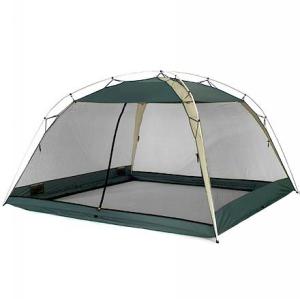
Expensive.
For more money you can get something that is lighter and better quality. I found this one at REI
online for about $200.
|
 |
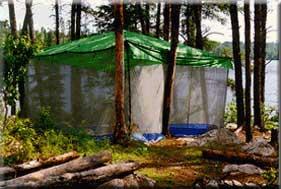
Light Weight.
Here's a bug shelter from Cooke Custom Sewing which
is is light weight and large. They have several other tarp designs as well.
|
 |
Home Made:
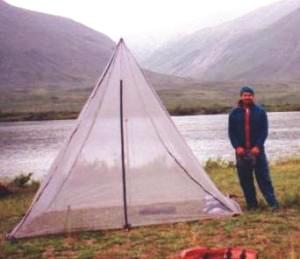
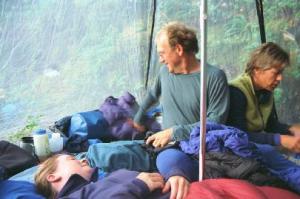
Before the Noatak trip, remembering meals eaten at a fast walk around camp, I made a simple bug tent that served
us well. It is basically a pyramid of bug netting with a single pole. I designed it to be large enough for 4 people
to lounge in. I have slept up to 4 people inside comfortably.
 |
 |
|
Set up in Alaska.
|
Four people sleeping inside.
|
Here are some tips for making this:
More recently I've made a bug tent out of a waterproof tarp with bug netting attached to the edges. Here's
a picture of a large bug shelter which is comfortable for 6 people:
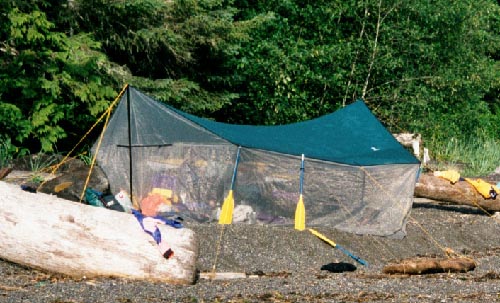
I've used velcro to attach the netting. This works fine, but is not a perfect solution. I would attached the
soft, loop side to the tarp. My last one had the hook side on the tarp and people with long hair complained that
thier hair was being pulled out. You will also need to re-enforce the stress points with extra tabs of velcro
(I should have a picture for this, but don't). The main problem with the velcro is that it prevents the edges
of the tarp from streching as much as the fabric, making for a loose tarp in the rain.
Our friends made a smaller tarp and sewed the netting directly to the tarp. They figured that there really
was no place that they would want the tarp with out the netting. Besides, you can always tie the netting up out
of the way. This seems like a good idea. The only problems with doing this for a large tarp is that you then
end up with one very large unit of fabric.
The door is a 2+ ft overlap of netting. There's a buckle half way down to help hold it shut in the wind. This
isn't really necessary. When it is windy there aren't any bugs.
Be careful when designing the triangular ends. You have to make them broad enough for the most spread out you
expect to make the tarp. In the tarp above I choose to leave one segment of polls behind, and hold up the edges
with spair paddles. This makes for a lower, wider tarp which works better in the wind and rain. A nylon strap
will snug up the ends when I want to lower the tarp sides.
Bug netting takes up a lot of space unless it is folded well. Compression sacks work well for keeping the volumn
under control
Combinations
Of course you'll use combinations of techniques and different techniques will work better on different trips.
Stay sane and happy.
[Back] [Home]
[Trip Journals] [Climbing]
[Kayaking] [Flight] [Photos]
[Food]
Page last modified:
Oct 07 22:54 2025
by
Tom Unger